Introduction
Grid'5000 is a large-scale and flexible testbed for experiment-driven research in all areas of computer science, with a focus on parallel and distributed computing, cloud, HPC, Big Data and AI.
It provides:
- access to a large amount of resources (about 25000 cores, 800 compute nodes, 550 GPUs...)
- highly configurable and controllable hardware
- advanced monitoring and measurement features
- Reproducible Research and Open Science support
- a large community of 500+ users
In this tutorial, we'll cover the basics of Grid'5000 usage. At the end of this session, you should be able to log into the platform, reserve computing resources, and perform basic experiments on them.
Grid'5000 platform
Grid'5000 is a distributed platform, composed of multiple sites scattered all over France, Luxembourg and Belgium. To use Grid'5000, a user will log into a given site (e.g., Luxembourg, Lyon, Grenoble, Toulouse, e.t.c.) and reserve computing resources located at this site in order to deploy their experimentation (or reserve resources across several sites to perform multi-site experimentation).
Discovering Grid'5000 resources
Grid'5000 resources are organized in clusters. A cluster is a named group of nodes with homogeneous hardware (CPU, RAM, disk space, GPU...): for example larochette in Luxembourg, neowise in Lyon, dahu in Grenoble...
A node is a bare-metal resource (server, or edge-class machine) composed of several cores. A node is named by appending its ID to the cluster name, for example: larochette-1 and larochette-2 are nodes belonging to the larochette cluster.
Finally, a core (CPU core) is the smallest resource size that can be reserved on Grid'5000. Each node is composed of several cores that can be reserved individually.
Grid'5000 wiki
Resources list
The Grid'5000 wiki provides a lot of information regarding the platform. On this website, we'll find the Global Hardware page which contains the list of Grid'5000 computing resources. You can filter your search by using the links on the page header to filter resources by site.
Resources availability
The Status Page provides links to check status of Grid'5000 and its resources. The "Resources reservations (OAR) status" section provides availability of Grid'5000 nodes on each site (among other types of resources, which are beyond the scope of this tutorial).
By clicking on the nodes link of a given site, a user can check the resources' availability for a given amount of time on a drawgantt chart.
This can help users see what type of resources are immediately free to use.
Status page
Maintenances, incidents, and other unpredicted events can alter the platform usability, resources' availability, or experiments' reproducibility. You can check the list of events currently ongoing, planned, and terminated at the following link: Grid'5000 platform status.
Sites descriptions
Each Grid'5000 site also has a Home page where links related to the site are aggregated and additional information can be found. The more interesting links on these pages are the hardware and network page links. Here are some links for the biggest sites:
- grenoble: hardware | network
- lille: hardware | network
- luxembourg: hardware | network
- lyon: hardware | network
- nancy: hardware | network
- nantes: hardware | network
- rennes hardware | network
Logging into a site
In order to reserve resources located on a given site, users must log into the related frontend. A frontend is a virtual machine which has a software environment very close to the one deployed on the nodes by default. There, users will be able to reserve resources, start deployment, and more.
If you haven't done it before, generate an SSH key and put your public key on Grid'5000 User Management System. This is done with the ssh-keygen command:
user@pc: ssh-keygen -t ed25519
The choice of how you configure your SSH key (passphrase, location...) is yours. Just remember that this key will be used each time you log in to Grid'5000.
When the SSH key is generated, copy the public key:
user@pc: cat .ssh/id_ed25519.pub
# Copy the output of this command.
Then go to the following link: https://api.grid5000.fr/stable/users/. Paste the content of your public key in the SSH Keys tab on the right.
First log in on Grid'5000
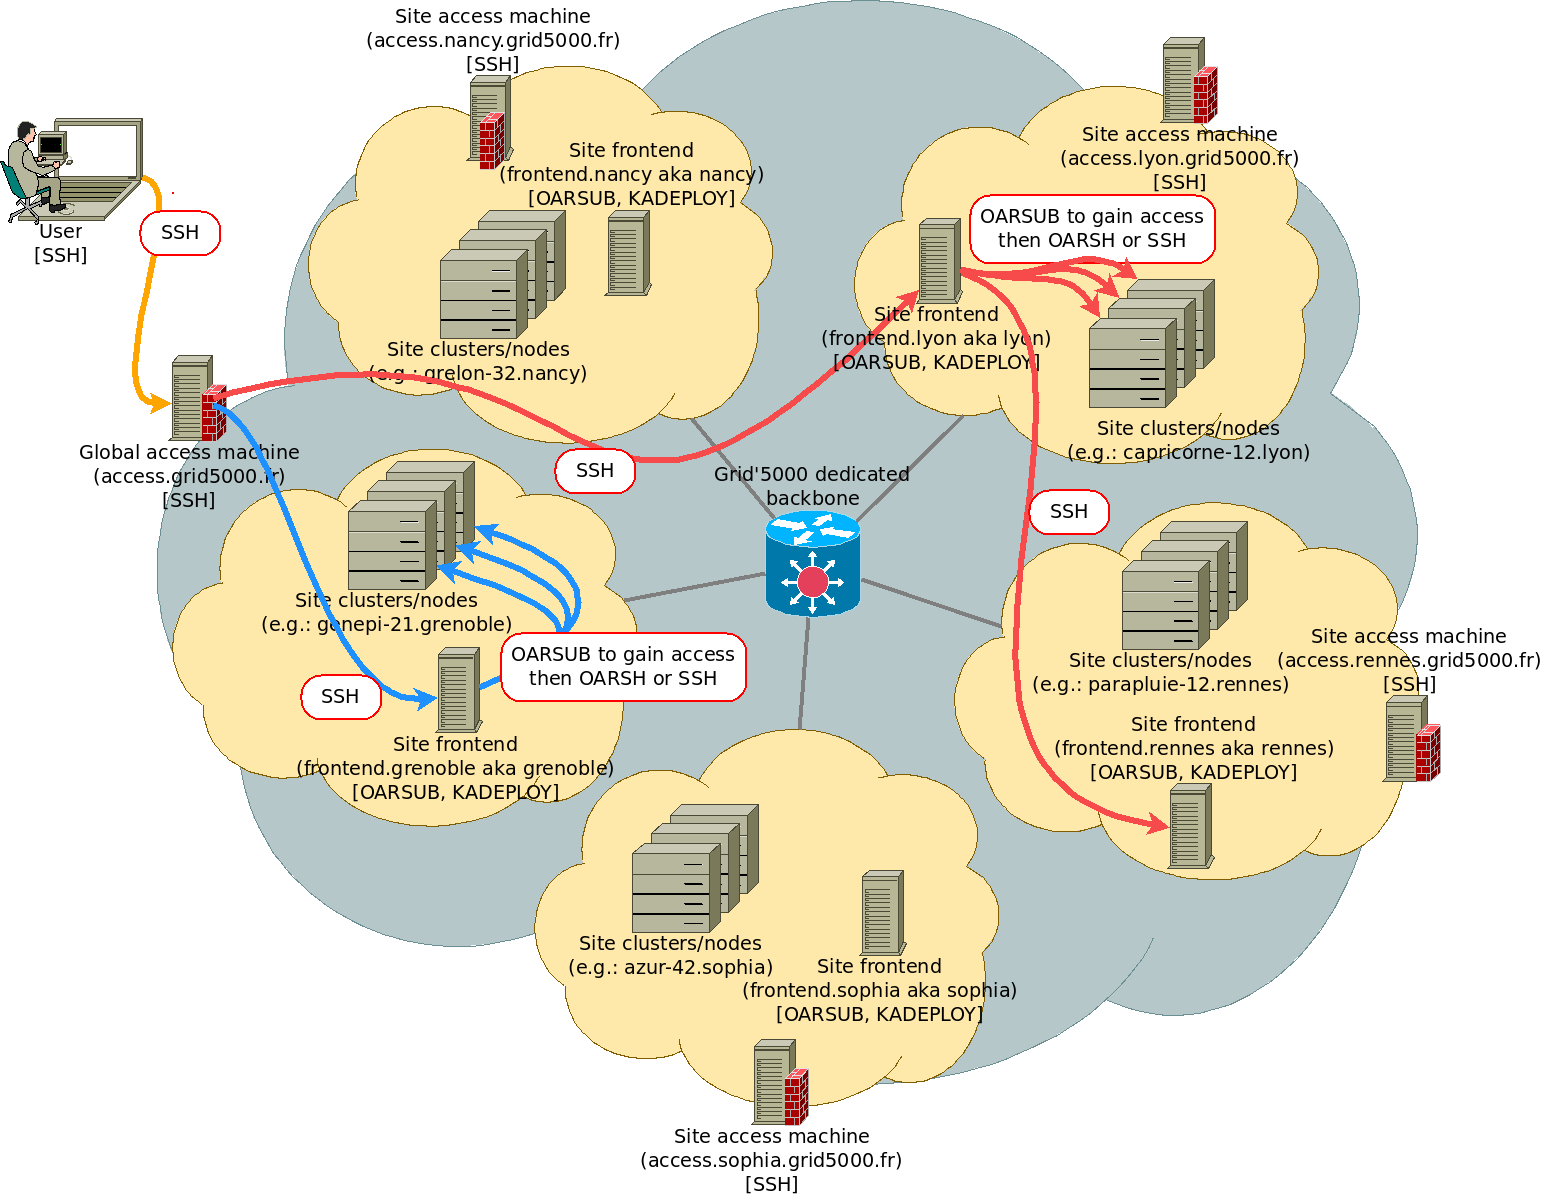
As seen in the schema describing the Grid'5000 platform, users must pass through access.grid5000.fr to gain access to the platform. Once on this machine, they can start another SSH connection to the site frontend they want to reach:
user@pc:~$ ssh <g5k_login>@access.grid5000.fr
user@access-north:~$ ssh luxembourg
user@fluxembourg:~$
You should be greeted by a message similar to below:
Linux fluxembourg 5.10.0-35-amd64 #1 SMP Debian 5.10.237-1 (2025-05-19) x86_64
------ Welcome to SLICES-FR - Luxembourg ------

As a member of the 'ulhpc' group, you can access the following clusters in queue 'default' on this site:
 - petitprince (2012): 11 nodes (2 CPUs Intel Xeon E5-2630L, 6 cores/CPU, 32GB RAM, 232GB HDD, 2 x 10Gb Ethernet)
 - larochette  (2024): 7 nodes (2 CPUs Intel Xeon Platinum 8568Y+, 48 cores/CPU, 4 GPUs Instinct MI210, 512GB RAM, 2980GB SSD, 1 x 25Gb Ethernet)
* with exotic job type:
 - vianden     (2024): 1 node (2 CPUs Intel Xeon Platinum 8470, 52 cores/CPU, 8 GPUs AMD Instinct MI300X, 2048GB RAM, 2980GB SSD, 1 x 100Gb Ethernet, 2 x 10Gb Ethernet)

More resources are available in other sites and queues. See <https://api.grid5000.fr/explorer>

** Other SLICES-FR sites: grenoble lille lyon nancy nantes rennes sophia strasbourg toulouse
** Other groups you are a member of: g5k-staff

** 1 bug could affect your experiment (see https://www.grid5000.fr/status/artifact/)
--> Inconsistent BIOS configuration details on petitprince
    https://intranet.grid5000.fr/bug/10647

** Useful links:
 - users home: https://www.grid5000.fr/w/Users_Home
 - usage policy: https://www.grid5000.fr/w/Grid5000:UsagePolicy
 - account management (password change): https://api.grid5000.fr/ui/account
 - support: https://www.grid5000.fr/w/Support
Last login: Tue Sep  2 16:43:50 2025 from 192.168.66.33
[user@fluxembourg|~]$
The Message of the Day provides a little summary of the site:
- resources provided by the site
- other sites list
- Events and bugs that could affect experiments
- links to the wiki
Efficient SSH connection with config file
Currently we need to manually connect to access.grid5000.fr via SSH and then start another SSH connection to a site. This is tedious and error prone, so we'll configure our SSH client to automatically start an SSH connection to access.grid5000.fr when we're trying to access the Grid'5000 network.
Open the file where your SSH user configuration is stored on your local machine. It is usually ~/.ssh/config. Add the following lines to this file, and replace <g5k_login> with your Grid'5000 login:
# Alias for the gateway (not really needed, but convenient)
Host g5k
  User <g5k_login>
  Hostname access.grid5000.fr
  ForwardAgent no

# Direct connection to hosts within Grid'5000 which are not reachable directly
Host *.g5k
  User <g5k_login>
  ProxyCommand ssh g5k -W "$(basename %h .g5k):%p"
  ForwardAgent no
The ProxyCommand given might not work with shells other than bash on the Grid'5000 side.
Now, we should be able to log into any Grid'5000 site "directly" with this command:
user@pc:~$ ssh luxembourg.g5k
user@fluxembourg:~$
First resource reservation with OAR
OAR is the tool used by Grid'5000 to manage its resources.
In this part of the tutorial, we'll connect to a Grid'5000 site and reserve resources to learn how users can perform experiments on the platform.
Before logging into a Grid'5000 site, it's best to already know what resources we'd like to reserve. Usually, users will explore the Hardware pages mentioned earlier and choose resources that fit their experiment's requirements. For this tutorial, we'll use the clervaux cluster in Luxembourg.
Reserving resources
We are now ready to reserve resources. Grid'5000's resources are managed by the OAR resources and tasks manager. Hence, the command to reserve a resource is oarsub. A basic oarsub command will allocate the first resource available for a default duration (wall time) of 1 hour:
[user@fluxembourg|~]$ oarsub -r now -q testing
# Filtering out exotic resources (vianden).
# Set walltime to default (3600 s).
OAR_JOB_ID=256908
# Advance reservation request: waiting for validation...
# Reservation valid --> OK
Our reservation has been assigned a job ID. Our reservation should be visible on the drawgantt of the site we're currently logged into. It may not have started yet, so it may be worth checking our reservation's state with the oarstat command:
[user@fluxembourg|~]$ oarstat -u
Job id     Name           User           Submission Date     S Queue
---------- -------------- -------------- ------------------- - ----------
1894417                   user           2025-06-08 12:19:52 R default
(-u option is used to show reservations from the current user only)
The state of the reservation will be shown in the S column. There are the following job states:
W: waiting - OAR must wait before scheduling the job, because the requested resources are not available yetL: launching - the job is starting, resources will be available to use soonR: running - The job is currently runningE: error - There was an error with the jobF: finished - The job has terminated
Check regularly the state of your job until its state is R.
Information about a reservation
After submitting a reservation, it can be useful to check related information, such as the node(s) allocated, with the oarstat command.
user@fluxembourg:~$ oarstat -f -j 1894417
id: 1894417
    array_id = 1894417
    array_index = 1
    name =
    project = g5k-staff
    owner = user
    state = Error
    wanted_resources = -l "{(type = 'default') AND exotic = 'NO'}/host=1,walltime=0:59:49"
    types = monitor=prom_.*default_metrics
    dependencies =
    assigned_resources = 2762+2763+2764+2765+2766+2767+2768+2769+2770+2771+2772+2773
    assigned_hostnames = clervaux-11.luxembourg.grid5000.fr
    queue = default
    command =
    launching_directory = /home/user
    stdout_file = <interactive shell>
    stderr_file = <interactive shell>
    type = INTERACTIVE
    properties = maintenance = 'NO'
    reservation = Scheduled
    walltime = 0:59:49
    submission_time = 2025-06-08 12:19:52
    start_time = 2025-06-08 12:20:02
    stop_time = 2025-06-08 12:45:26
    cpuset_name = user_1894417
    initial_request = oarsub -r now
    message = R=12,W=0:59:49,J=R,P=g5k-staff,T=monitor=prom_.*default_metrics
    scheduled_start = no prediction
    resubmit_job_id = 0
    events =
If needed, oarstat can output in YAML format with the -Y parameter, or JSON with the -J parameter.
The node allocated to our reservation can be found by looking at the assigned_hostnames property of the oarstat output. This will help us log into our resource during the next step.
Connecting to the reservation
Now that we have a resource reserved, we can connect to the node allocated and use it. This can be done using SSH:
[user@fluxembourg|~]$ ssh clervaux-11
user@clervaux-11:~$
You can also use the following command to get connected to the node:
[user@fluxembourg|~]$ oarsub -C
user@clervaux-11:~$
oarsub -Cwill work only if you have one reservation currently ongoing at the moment. If you have several reservations running at the same time,oarsubcan't decide which node it will send you to, and it will ask you to enter the OAR Job ID like this:oarsub -C <jobid>
You should see that your prompt changed: it now displays the current Grid'5000 node on which you are logged.
Information about storage on Grid'5000
On Grid'5000 infrastructure, users have access to several means of storing their files. First, each user is allocated one homedir directory per site, with a 25GB soft quota (and 100GB hard quota). These homes are mounted by default on the nodes that are used by an experiment.
Apart from this homedir mounted via NFS, computing nodes have their own filesystem on disk by default. This means that if someone is writing files into /tmp or /var they are writing directly to the nodes' disk, thus having quicker IOs than if they were writing in their home via NFS. However, disks are not persistent on Grid'5000, so any file written on a node's disk will be lost eventually. Users still need to bring back their files to their home at the end of their experiment.
Finally, users can benefit from storage groups. Storage groups are big dedicated volumes located on NFS servers which volume is around several terabytes. These volumes can be associated with a dedicated user group, ensuring that only a subset of users are allowed to access.
Each of these storage options is described in the Storage Guide.
Node usage example
At this time, users start prototyping their experiments. For example, we could clone a git repository, build it, and then execute the code. Let's assume we wanted to run a benchmark. We'll get the NAS Parallel Benchmarks (NPB), compile and run them. Once done, we'll export the result to our home.
Let's start by going into the /tmp/ directory and downloading the benchmarks' source code:
user@clervaux-11:~$ cd /tmp/
user@clervaux-11:~$ wget 'https://www.nas.nasa.gov/assets/npb/NPB3.4.3.tar.gz'
user@clervaux-11:~$ tar -xzvf NPB3.4.3.tar.gz
It's important to keep in mind that the
/tmp/directory is located on the disk's filesystem, while our current home directory is mounted via NFS from a storage server. Working in/tmp/reduces network I/O overhead and reduces pressure on the storage servers.
Now we'll use the default template and Makefile to compile the benchmarks:
user@clervaux-11:~$ cd NPB3.4.3/NPB3.4-OMP
user@clervaux-11:/tmp/NPB3.4.3/NPB3.4-OMP$ cp config/suite.def.template config/suite.def
user@clervaux-11:/tmp/NPB3.4.3/NPB3.4-OMP$ cp config/make.def.template config/make.def
user@clervaux-11:/tmp/NPB3.4.3/NPB3.4-OMP$ make -j$(nproc) suite
Now that everything is compiled, we can run the benchmarks. The following commands create a directory where the benchmarks output will be stored. The benchmarks are run with the default configuration, and once they have completed their output is copied to our home directory.
user@clervaux-11:/tmp/NPB3.4.3/NPB3.4-OMP$ mkdir /tmp/benchs
user@clervaux-11:/tmp/NPB3.4.3/NPB3.4-OMP$ for bench in $(ls bin); do ./bin/$bench | tee /tmp/benchs/$bench.txt; done
user@clervaux-11:/tmp/NPB3.4.3/NPB3.4-OMP$ cp -R /tmp/benchs ~/benchs-$OAR_JOBID
The benchmarks output should have been copied to our home directory. Each benchmark output can now be read with cat or less, and will stay in our home even when our reservation is over.
user@clervaux-11:/tmp/NPB3.4.3/NPB3.4-OMP$ cd
user@clervaux-11:~$ cat benchs-$OAR_JOBID/lu.S.x.txt
In the example we use the
OAR_JOBIDvariable because we are still "in" our reservation. If someone wishes to come back to their results later, they'll have to enter the reservation's job id manually.
Deeper customization by gaining root access with sudo-g5k
One of the key features of Grid'5000 is that you are allowed to become root under certain conditions to fully customize your experiment setup. One way of becoming root is by reserving a whole computing node as we did and using the sudo-g5k command. This command is a wrapper for sudo that will perform safety checks before granting you the right to use the default sudo and become root.
Once logged into their computing resource, users can ask for root access with the following command:
user@clervaux-11:~$ sudo-g5k [command-to-execute]
Providing a command while using
sudo-g5kis not mandatory.
Once sudo-g5k has run, the platform is aware that the user is going to perform non-trivial operations on the node. When their job is finished, the default environment will be redeployed to provide a clean copy for future users.
After running sudo-g5k, it is possible to run root commands with sudo or to become root directly:
user@clervaux-11:~$ sudo -iu root
root@clervaux-11:~#
Note that the
$at the end of the prompt has changed to#, indicating you are indeed root.
Once a user is allowed to use the root account, they can perform any operation that would be forbidden as a normal user:
root@clervaux-11:~# apt update
root@clervaux-11:~# apt upgrade
root@clervaux-11:~# apt install ninvaders
root@clervaux-11:~# exit
user@clervaux-11:~$ ninvaders
You can quit ninvaders by using
Ctrl+cshortcut if the lecturer or your thesis professor is coming.

Be aware that using sudo-g5k will trigger a full redeployment of the node at the end of your reservation. sudo-g5k is a very great tool for prototyping, but it should not be used intensively, especially on automatic and short reservations. By using sudo-g5k in short reservations performed by a script you might end up submitting reservations faster than the node can be redeployed, causing a starvation phenomenon for other users.
Releasing resources
When work is finished on the node we reserved, we can log out and delete our job with the oardel command:
user@clervaux-11:~$ logout
Connection to clervaux-11.luxembourg.grid5000.fr closed.
Disconnected from OAR job 1894417.
[user@fluxembourg|~]$ oardel 1894417
Deleting the job = 1894417 ...REGISTERED.
The job(s) [ 1894417 ] will be deleted in the near future.
If we don't do the oardel command, the node will sit idle for approximately one hour (due to the fact that our reservation has a default duration, also called "job walltime", of 1 hour).
It is important to delete jobs that are holding unused resources to make them available to other users.
Plan a reservation on resources
Users can reserve resources in advance for a given date and a given amount of time. This can be done with the oarsub command by specifying the start date and end date of the job:
user@fluxembourg:~$ oarsub -r "2025-06-10 10:00, 2025-06-10 12:00"
# Filtering out exotic resources (vianden).
OAR_JOB_ID=256910
# Advance reservation request: waiting for validation...
# Reservation valid --> OK
Here, a node has been allocated on 2025-06-10 between 10AM and 12PM (French time). The job will start automatically at the given date, and we'll be able to log in when it starts.
Delete this job, since we are not going to use it:
user@fluxembourg:~$ oardel 256910
Deleting the job = 256910 ...REGISTERED.
The job(s) [ 256910 ] will be deleted in the near future.
Advanced resource management
For now, we have been reserving resources without specifically asking for anything. This part of the tutorial will present some ways to select resources according to given criteria.
Filter resources with -p option
Cluster name
With the -p option of the oarsub command we can ask for a given cluster. For example:
user@fluxembourg:~$ oarsub -r now -p larochette
Cluster properties
The -p option can also be used to specify hardware specs we want to get for our reservation. For example, -p "core_count > 8" will let us reserve computing resources with more than 8 cores.
The string passed with the -p option follows SQL syntax, so we can write selections like this:
user@fluxembourg:~$ oarsub -r now -p "cputype LIKE 'Intel Xeon%'"
This oarsub command will reserve one node having an Intel Xeon CPU.
For more properties, consult the OAR properties page of the wiki. The OAR Syntax Simplification page also describes how to ease the use of the -p parameter by avoiding having to write SQL syntax.
Exotic type
By default, OAR will exclude some resources from the pool of resources that can be allocated to users. These resources are called exotic. A resource can be declared exotic for several reasons:
- It is rare on the platform (only a few machines with the same particular characteristics are available in Grid'5000)
- Its usage is complex: a relevant usage of these resources requires specific knowledge
- It has characteristics too different from regular Grid'5000 resources to be allocated as a "standard" resource
For all the reasons mentioned above, some resources won't be allocated unless users specify the -t exotic parameter in their oarsub command.
The list of exotic resources available on Grid'5000 can be found here: https://www.grid5000.fr/w/Exotic.
Here is an oarsub command that will reserve the vianden node in Luxembourg:
user@fluxembourg:~$ oarsub -r now -p vianden -t exotic
Resources quantity
The -l parameter can be used to alter various parameters regarding the reservation:
- walltime of the job, which corresponds to reservation duration
- number of resources requested (nodes, cpu, cores, gpu...)
By using these options, you can modify the granularity of your reservation and extend the time your resources will be allocated to you.
The following command will book 2 nodes for a duration of 4 hours:
user@fluxembourg:~$ oarsub -r now -l nodes=2,walltime=4:00
Once again, when reserving several nodes at the same time, the oarstat command can provide the list of reserved computing resources. Here is a command that formats the output of oarstat into JSON and prints the assigned_network_address of the nodes allocated:
user@fluxembourg:~$ oarstat -j 1899660 -fJ | jq '."1899660".assigned_network_address'
[
  "clervaux-1.luxembourg.grid5000.fr",
  "clervaux-10.luxembourg.grid5000.fr"
]
Extend a reservation with oarwalltime
Once the walltime of a reservation is reached, users are logged out of their node and their processes are killed. To avoid this issue, users can extend the walltime of their reservation while it is running with the command oarwalltime. Note that oarwalltime will not be able to extend the reservation duration every time; if someone is in the queue for the same resources, based on several parameters oarwalltime might refuse to extend the walltime.
The following command extends by 1 hour the walltime of a reservation:
user@fluxembourg:~$ oarwalltime <oar_job_id> +1:00
Basics of system deployment with kadeploy3
One of the key features of Grid'5000 is that users are allowed to deploy another operating system on the computing nodes they reserved and become root on their resources. Operating system deployment is done with kadeploy3.
With kadeploy3, users can deploy software environments (usually GNU/Linux distributions) on their computing resources and customize the system to set up a complex experiment.
Grid'5000 environments
The Grid'5000/SLICES-FR & ABACA technical teams maintain several environments that can be deployed. Here is a partial list of the environments available:
| environment | quick description |
|---|---|
| debian11-min | Debian 11 distribution with standard system utilities |
| debian11-nfs | debian11-min with nfs configuration for user home mounting |
| debian11-big | debian11-nfs with partial support of modules providing for scientific software |
| debian12-min | Debian 12 distribution with standard system utilities |
| debian12-nfs | debian12-min with user home mounted on the computing node |
| debian12-big | debian12-nfs with partial support of modules providing for scientific software |
| ubuntu2404-min | ubuntu 24.04 with standard system utilities |
| ubuntu2404-nfs | ubuntu2404-min with nfs configuration for user home mounting |
The full list of environments can be found on the following page.
On a site frontend, the command kaenv3 can be used to print the list of available environments.
user@fluxembourg:~$ kaenv3
Make a reservation for deployment
"-t deploy" parameter
In order to be deployed, nodes must be reserved with the -t deploy parameter. This notifies OAR that we are about to change the operating system of the node, and that it will have to redeploy the node back to its original environment when our job is over.
Let's reserve a node with this parameter:
user@fluxembourg:~$ oarsub -r now -t deploy -q testing
Environment deployment
Once the job has started, we can start the deployment using:
user@fluxembourg:~$ kadeploy3 -e debian12-min -m clervaux-3.luxembourg.grid5000.fr
-m can be given multiple times to deploy several nodes at once)
Alternatively, you can use your reservation's job ID to perform the deployment:
user@fluxembourg:~$ oarsub -C 1895784
user@fluxembourg:~$ kadeploy3 -e debian12-min
Once the deployment is over, we can log in as root on our newly-deployed node:
user@fluxembourg:~$ ssh root@clervaux-3
root@clervaux-3:~#
To ensure we have changed the distribution running on the node, we can take a look at the file /etc/os-release, or install lsb_release:
root@clervaux-3:~# apt update && apt install -y lsb-release
root@clervaux-3:~# lsb_release -a
Customize environment
Now that we are logged in as root on the node, we can fully customize the system. For example, install upgrades, install a newer kernel, drivers, toolchain etc.
Once a user is happy with their customization, they should think about saving their environment to be able to deploy it later without having to reconfigure it. The Environment Creation page describes two methods for storing Grid'5000 environments:
- saving the current customized environment to a compressed tarball with tgz-g5k
- write a reproducible recipe and generate the environment with Kameleon
Serial console with kaconsole3
Now that we gained root access to a computing node, the risk of committing a regrettable mistake increases: some modification performed as root may disconnect the node from the network, or prevent it from booting.
To prevent users from being stuck in situations where they lost access to their resource and are forced to redeploy a full environment, Grid'5000 provides a way to access the nodes via their serial console.
This is done by using the kaconsole3 command.
The following command will give access to a node's serial console, if we reserved it via a -t deploy job:
user@fluxembourg:~$ kaconsole3 -m clervaux-3
Since you are accessing a serial console, it is possible that you don't see anything at first. Pressing
ENTERshould make information appear, such as the login prompt. To exit a kaconsole3 session, type&., or pressESC4 times.
This tool is also very useful for debugging boot problems. Let's reboot the node and look at the kaconsole3 output to see the boot logs of the node. Rebooting a node reserved via a -t deploy job can be done with the kareboot3 command. Open a new shell, connect to Grid'5000 and enter the following command. Next, go to your kaconsole3 session and look at the logs outputted by the kernel on serial TTY.
user@fluxembourg:~$ kareboot3 simple -m clervaux-3
user@fluxembourg:~$ kaconsole3 -m clervaux-3
Example of network mistake repaired with kaconsole3
A common use case of Grid'5000 is to deploy network topologies to study distributed systems. In this context, a mistake in the network configuration can be costly: a misconfigured node might not be reachable anymore, thus being unconfigurable.
We'll simulate this mistake by harshly deactivating the network interface of our node:
user@fluxembourg:~$ ssh root@clervaux-3
Use the ip a command to see which interface has an IP address. On the clervaux cluster, this interface is enp1s0f0np0. Let's shutdown this interface:
root@clervaux-4:~# ifdown enp1s0f0np0
Our terminal is hanging! This means we have cut the branch we were sitting on: the node is not reachable via the network. Let's log into Grid'5000 in another terminal and try to ping our node:
user@pc:~$ ssh luxembourg.g5k
user@fluxembourg:~$ ping clervaux-3
PING clervaux-3.luxembourg.grid5000.fr (172.16.180.3) 56(84) bytes of data.
From fluxembourg.luxembourg.grid5000.fr (172.16.191.109) icmp_seq=1 Destination Host Unreachable
From fluxembourg.luxembourg.grid5000.fr (172.16.191.109) icmp_seq=2 Destination Host Unreachable
From fluxembourg.luxembourg.grid5000.fr (172.16.191.109) icmp_seq=3 Destination Host Unreachable
^C
--- clervaux-3.luxembourg.grid5000.fr ping statistics ---
6 packets transmitted, 0 received, +3 errors, 100% packet loss, time 5113ms
pipe 4
Pings don't reach our computing resource. It is really disconnected from the network. We'll use kaconsole3 to gain access to the serial console of the node and then put back up the network interface of the node:
Reminder: the default password for the root account in Grid'5000 environments is
grid5000.
user@fluxembourg:~$ kaconsole3 -m clervaux-3
root
password:
[...]
root@clervaux-4:~# ifup enp1s0f0np0
We have restored the network connection! The previous SSH connection should resume a few moments later.
Experiment automation
Grid'5000 experimentation workflow
On Grid'5000, there is a distinction between interactive usage and non-interactive usage. For now, we've been using resources in 'interactive mode', meaning that we were performing every action by ourselves. 'Non-interactive mode' is when someone lets a script (bash, python, ruby, e.t.c.) use the resources that were allocated. Even resource reservations can be scripted.
Grid'5000 usage is split between day and night: the day is intended to let people use computing nodes interactively, while the night (and full weekends) are used to run longer and automated reservations. Grid'5000 Usage Policy provides more information about this day/night concept.
Submitting a command
For simple tasks, users can submit a command that will be executed when the job starts. When we made our previous reservations for this tutorial, there was actually a command that was executed by default: sleep infinity. That was this command that was holding our job in place.
By providing our own command, we can start a script at the beginning of our reservation that will handle our experiment (for example, start a deployment, setup a software stack on the node, and then run a series of benchmarks).
Let's submit a simple command to experiment with this feature:
user@fluxembourg:~$ oarsub -r now "lscpu > lscpu.txt"
Let this job be scheduled and executed, and then take a look at the lscpu.txt file. You'll see that this file has been populated with the output of lscpu, and this output suggests that it has been executed on the computing node that was allocated to you.
If your non-deploy reservation contains several nodes, the given command will be executed on the first allocated node, which is called the head node. A deploy reservation will have its command executed on the site's frontend. When this command terminates, the reservation is over, and any remaining connection will be closed. When no command is provided (as we did until now), a default
sleep infinitycommand is started. This command will never complete, so it ensures that the job will only terminate when the reservation's walltime has been exceeded.
Instead of submitting a basic command like we did, we could submit a command launching a script of our own and performing a whole experiment: fetching source code, building, running, extracting relevant metrics.
Script execution
While specifying a command of their own with their reservation, users can execute a script of their own to handle their experiment. Here is a small bash script that will deploy an environment and run a stress command:
#!/bin/bash

# bash strict mode configuration
set -euo pipefail
IFS=$'\n\t'

ENV=debian12-min
NODES_FILE=~/.nodes

if [ -z "$OAR_NODEFILE" ]; then
    echo "OAR_NODEFILE variable not defined."
    echo "Please submit a reservation and rerun this script."
    exit 1
fi

cat $OAR_NODEFILE | sort | uniq > $NODES_FILE
kadeploy3 -f $OAR_NODEFILE -e $ENV
clush -l root --hostfile=$NODES_FILE "apt-get update && apt-get install -y stress"
clush -l root --hostfile=$NODES_FILE 'stress -c $(nproc) -t 60 > /tmp/stress.txt'

mkdir -p stress
clush -l root --hostfile=$NODES_FILE --rcopy /tmp/stress.txt --dest stress

rm $NODES_FILE
This script deploys a
-minenvironment. Min environments don't include NFS tools and configuration allowing automagic homedir mounting. This is why we must use scp to retrieve the data generated by our experiment at the end of the job. In a similar way, users often need to clone git repositories or send source code to their reserved nodes at the beginning of their reservation.
Let's save this script as experiment.sh in our home directory. Be careful about setting the x permission, as we'll need to execute it:
user@fluxembourg:~$ chmod +x experiment.sh
user@fluxembourg:~$ oarsub -t deploy -r now "./experiment.sh" -q testing
We can track the progress of the job by looking at the job's state with the oarstat command, or by looking at OAR.<jobid>.stdout and OAR.<jobid>.stderr content. Once the reservation is over, we should see that a stress directory was created in our home, and a .txt file has been synced inside.
Let's find the job id of our reservation and then monitor our experiment with the multitail command:
user:~$ multitail -i OAR.<jobid>.stdout -i OAR.<jobid>.stderr
Fully scripted usage of Grid'5000 through the REST API
Programmatically discovering resources
Grid'5000 provides a REST API that allows users to automatically discover resources and allows monitoring their evolution over time. Using tools like curl, or a simple web browser, users can obtain a lot of information such as:
- Grid'5000 sites list and information: https://api.grid5000.fr/stable/sites/
- luxembourg site description: https://api.grid5000.fr/stable/sites/luxembourg/
- Clusters information:
- luxembourg clusters information: https://api.grid5000.fr/stable/sites/luxembourg/clusters/
- Nodes information:
- luxembourg vianden-1 node information: https://api.grid5000.fr/stable/sites/luxembourg/clusters/vianden/nodes/vianden-1
These endpoints allow users to explore Grid'5000 resources programmatically. Here is a bash script that will search for any cluster having more than 2 network interfaces:
#!/bin/bash

mapfile -t sites < <(curl -s https://api.grid5000.fr/stable/sites | jq -r ".items[] | .uid")

for site in "${sites[@]}"; do
    mapfile -t clusters < <(curl -s https://api.grid5000.fr/stable/sites/$site/clusters | jq -r ".items[] | .uid")
    for cluster in "${clusters[@]}"; do
        count=$(curl -s https://api.grid5000.fr/stable/sites/$site/clusters/$cluster/nodes.json | jq ".items[0].kavlan | length")
        if [ $(($count)) -ge 2 ]; then
            echo "$site: $cluster has $count network interfaces"
        fi
    done
done
This script must be executed from within Grid'5000. We'll see in the next steps how we can log into the platform. Users wanting to reach the API from outside Grid'5000 will have to authenticate themselves using their Grid'5000 account.
Job submission
Since Grid'5000 provides a REST API, each API call can be automatized via a high-level script (python, ruby, bash, e.t.c.). This allows users to script and reproduce all their experiments: from the reservation to the results saving.
Let's write a python script that submits the reservation for our previous stress reservation. Below is a script that will ask users to specify the Grid'5000 site and cluster where to perform the experiment, and will then submit a reservation executing the experiment.sh shown above.
This python script assumes that there is a bash script named
experiment.shlocated at the root of your home directory and executable! If you want to launch the experiment on a different site you must ensure that theexperiment.shscript has been copied to the homedir of this site.
import os
import requests
from time import sleep

# When querying the API from the frontends, users are already identified.
# However, if using this script from outside of Grid'5000, g5k_auth
# must be a tuple of strings: (username, password)
g5k_auth = None

site_id = input("Enter a site: ")
cluster = input("Enter a cluster name: ")

api_job_url = f"https://api.grid5000.fr/stable/sites/{site_id}/jobs"

payload = {
    'resources': 'nodes=1',
    'types': ['deploy'],
    'command': './experiment.sh',
    'properties': f"cluster='{cluster}'",
    'name': 'slices-fr-school-2025'
}

job = requests.post(api_job_url, data=payload, auth=g5k_auth).json()
job_id = job['uid']

print(f"Job submitted ({job_id})")
While executing this script, you will be asked for a site and a cluster name:
user@fluxembourg:~$ python api.py
Enter a site: luxembourg
Enter a cluster: clervaux
Job submitted (1900199)
Then, we can monitor our job with the oarstat and kaconsole3 commands. At some point, we should see a new file appear in the stress folder located in our home directory.
This python script has been kept simple for teaching purposes, but it could be far more complex. For example, kadeploy3 deployment can also be automatized through the Grid'5000 API. A user could also monitor the state of the reservation (waiting, launching, running, e.t.c.) to provide more information as the reservation is handled by OAR.
Many libraries are already available to reduce the amount of code needed to script a Grid'5000 experiment. They are listed on the Experiment scripting tutorial page.
To go further: links and tutorials
This tutorial introduced a very basic usage of Grid'5000 and its resources.