Self management of work environments in UL HPC with Conda
Packages provided through the standard channels of modules and containers are optimized for the ULHPC clusters to ensure their performance and stability. However, many packages where performance is not critical and are used by few users are not provided through the standard channels. These packages can still be installed locally by the users through an environment management system such as Conda.
Contact the ULHPC before installing any software with Conda
Prefer binaries provided through modules or containers. Conda installs generic binaries that may be suboptimal for the configuration of the ULHPC clusters. Furthermore, installing packages locally with Conda consumes quotas in your or your project's account in terms of storage space and number of files.
Contact the ULHPC High Level Support Team in the service portal [Home > Research > HPC > Software environment > Request expertise] to discuss possible options before installing any software.
Conda is an open source environment and package management system. With Conda you can create independent environments, where you can install applications such as python and R, together with any packages which will be used by these applications. The environments are independent, with the Conda package manager managing the binaries, resolving dependencies, and ensuring that package used in multiple environments are stored only once. In a typical setting, each user has their own installation of a Conda and a set of personal environments.
TL;DR: install and use the Micromamba package manager.
A brief introduction to Conda
A few concepts are necessary to start working with Conda. In brief, these are package managers which are the programs used to create and manage environments, channels which are the repositories that contain the packages from which environments are composed, and distributions which are methods for shipping package managers.
Package managers
Package managers are the programs that install and manage the Conda environments. There are multiple package managers, such as conda, mamba, and micromamba.
The UL HPC centre supports the use of micromamba for the creation and management of personal Conda environments.
Channels
Conda channels are the locations where packages are stored. There are also multiple channels, with some important channels being:
defaults, the default channel,anaconda, a mirror of the default channel,bioconda, a distribution of bioinformatics software, andconda-forge, a community-led collection of recipes, build infrastructure, and distributions for the conda package manager.
The most useful channel that comes pre-installed in all distributions, is Conda-Forge. Channels are usually hosted in the official Anaconda page, but in some rare occasions custom channels may be used. For instance the default channel is hosted independently from the official Anaconda page. Many channels also maintain web pages with documentation both for their usage and for packages they distribute:
Distributions
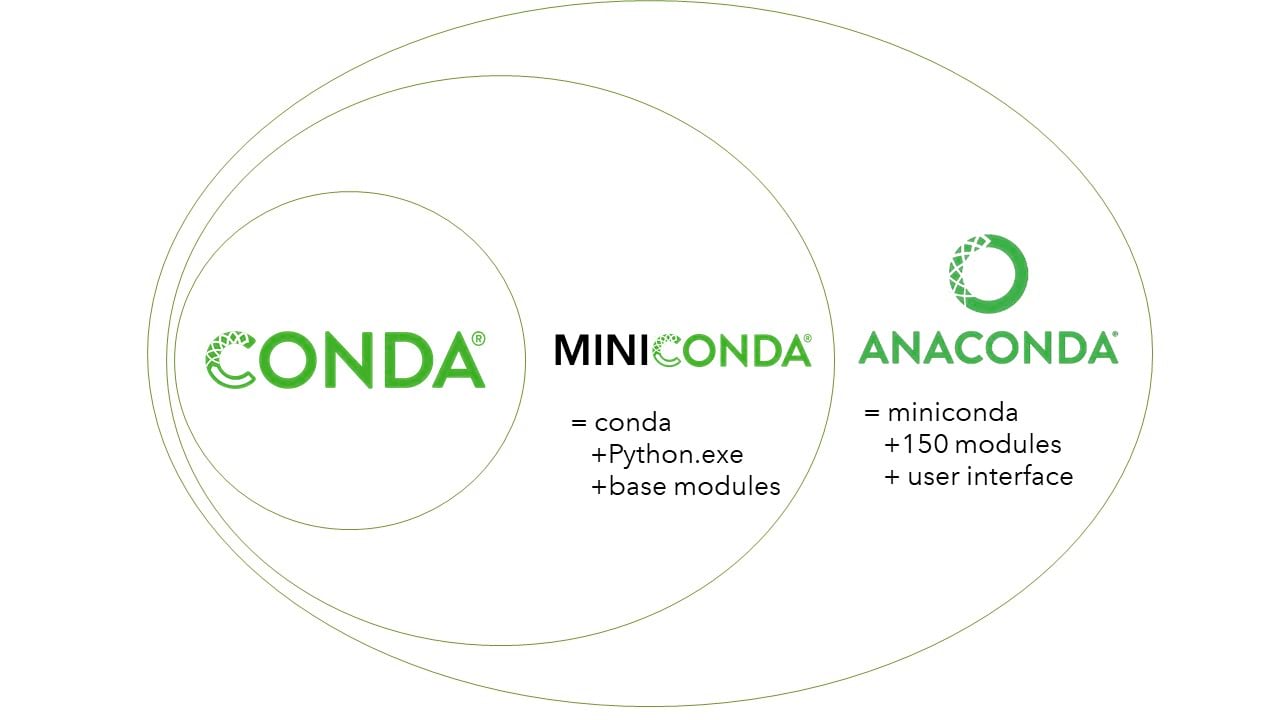
Quite often, the package manager is not distributed on its own, but with a set of packages that are required for the package manager to work, or even with some additional packages that required for most applications. For instance, the conda package manager is distributed with the Miniconda and Anaconda distributions. Miniconda contains the bare minimum packages for the conda package manager to work, and Anaconda contains multiple commonly used packages and a graphical user interface. The relation between these distributions and the package manager is depicted in the following diagram.
The situation is similar for Mamba distributions. These distributions are supported by Conda-Forge, and their default installation options set-up conda-forge as the default and only channel during installation. The defaults or its mirror anaconda must be explicitly added if required. The distribution using the Mamba package manager was originally distributed as Mambaforge and was recently renamed to Miniforge. Miniforge comes with a minimal set of python packages required by the Mamba package manager. The distribution using the Micromamba package manager ships no accompanying packages, as Micromamba is a standalone executable with no dependencies. Micromamba is using libmamba, a C++ library implementing the Conda API.
The Micromamba package manager
![]()
The Micromaba package manager is a minimal yet fairly complete implementation of the Conda interface in C++, that is shipped as a standalone executable. The package manager operates strictly on the user-space and thus it requires no special permissions are required to install packages. It maintains all its files in a couple of places, so uninstalling the package manager itself is also easy. Finally, the package manager is also lightweight and fast.
UL HPC provides support only for the Micromamba package manager.
Installation
A complete guide regarding Micromamba installation can be found in the official documentation. To install micromamaba in the HPC clusters, log in to Aion or Iris. Working on a login node, run the installation script,
"${SHELL}" <(curl -L micro.mamba.pm/install.sh)
- The directory for the installation of the binary file:
Leave empty and press enter to select the default displayed within brackets. Your
Micromamba binary folder? [~/.local/bin].bashrcscript should include~/.local/binin the$PATHby default. - The option to add to the environment autocomplete options for
micromamba:Press enter to select the default optionInit shell (bash)? [Y/n]Y. This will append a clearly marked section in the.bashrcshell. Do not forget to remove this section when uninstalling Micromamba. - The option to configure the channels by adding conda-forge:
Press enter to select the default option
Configure conda-forge? [Y/n]Y. This will setup the~/.condarcfile withconda-forgeas the default channel. Note that Mamba and Micromamba will not use thedefaultschannel if it is not present in~/.condarclikeconda. - The option to select the directory where environment information and packages will be stored:
Press enter to select the default option displayed within brackets.
Prefix location? [~/micromamba]
To setup the environment log-out and log-in again. Now you can use micromamba, including the auto-completion feature.
Managing environments
As an example, the creation and use of an environment for R jobs is presented. The command,
micromamba create --name R-project
R-project. The environment is activated with the command
micromamba activate R-project
Next, install the base R environment package that contains the R program, and any R packages required by the project. To install packages, first ensure that the R-project environment is active, and then install any package with the command
micromamba install <package_name>
micromamba install --channel <channel_name> <package_name>
For instance, the basic functionality of the R software environment is contained in the r-base package. Calling
micromamba install --channel conda-forge r-base
plm becomes r-plm and so on. After all the required packages have been installed, the environment is ready for use.
Packages in the conda-forge channel come with instructions for their installation. Quite often the channel is specified in the installation instructions, -c conda-forge or --channel conda-forge. While the Micromamba installer sets-up conda-forge as the default channel, latter modification in ~/.condarc may change the channel priority. Thus it is a good practice to explicitly specify the source channel when installing a package.
After work in an environment is complete, deactivate the environment,
micromamba deactivate
Micromamba supports almost all the subcommands of Conda. For more details see the official documentation.
Using environments in submission scripts
Since all computationally heavy operations must be performed in compute nodes, Conda environments are also used in jobs submitted to the queuing system. Returning to the R example, a submission script running a single core R job can use the R-project_name environment as follows:
#SBATCH --job-name R-test-job
#SBATCH --nodes 1
#SBATCH --ntasks-per-node 1
#SBATCH --cpus-per-task 1
#SBATCH --time=0-02:00:00
#SBATCH --partition batch
#SBATCH --qos normal

echo "Launched at $(date)"
echo "Job ID: ${SLURM_JOBID}"
echo "Node list: ${SLURM_NODELIST}"
echo "Submit dir.: ${SLURM_SUBMIT_DIR}"
echo "Numb. of cores: ${SLURM_CPUS_PER_TASK}"

micromamba activate R-project

export OMP_NUM_THREADS=1
srun Rscript --no-save --no-restore script.R

micromamba deactivate
Useful scripting resources
Cleaning up package data
The Conda environment managers download and store a sizable amount of data to provided packages to the various environments. Even though the package data are shared between the various environments, they still consume space in your or your project's account. There are limits in the storage space and number of files that are available to projects and users in the cluster. Since Conda packages are self managed, you need to clean unused data yourself.
There are two main sources of unused data, the compressed archives of the packages that Conda stores in its cache when downloading a package, and the data of removed packages. All unused data in Micromoamba can be removed with the command
micromamba clean --all
${HOME}/micromamba).
Updating environments to remove old package versions
As we create new environments, we often install the latest version of each package. However, if the environments are not updated regularly, we may end up with different versions of the same package across multiple environments. If we have the same version of a package installed in all environments, we can save space by removing unused older versions.
To update a package across all environments, use the command
for e in $(micromamba env list | awk 'FNR>2 {print $1}'); do micromamba update --name $e <package name>; done
for e in $(micromamba env list | awk 'FNR>2 {print $1}'); do micromamba update --name $e --all; done
FNR>2 removes the headers in the output of micromamba env list, and is thus sensitive to changes in the user interface of Micromamba.
After updating packages, the clean command can be called to removed the data of unused older package versions.
Sources
Combining Conda with other package and environment management tools
It may be desirable to use Conda to manage environments but a different tool to manage packages, such as pip. Or subenvironments may need to be used inside a Conda environment, as for instance with tools for creating and managing isolated Python installation, such as virtualenv, or with tools for integrating managed Python installations and packages in project directories, such as Pipenv and Poetry.
Conda integrates well with any such tool. Some of the most frequent cases are described bellow.
Managing packages with external tools
Quite often a package that is required in an environment is not available through a Conda channel, but it is available through some other distribution channel, such as the Python Package Index (PyPI). In these cases the only solution is to create a Conda environment and install the required packages with pip from the Python Package Index.
Using an external packaging tool is possible because of the method that Conda uses to install packages. Conda installs package versions in a central directory (e.g. ~/micromamba/pkgs). Any environment that requires a package links to the central directory with hard links. Links are added to the home directory (e.g. ~/micromamba/envs/R-project for the R-project environment) of any environment that requires them. When using an external package tool, package components are installed in the same directory where Conda would install the corresponding link. Thus, external package management tools integrate seamlessly with Conda, with a couple of caveats:
- each package must be managed by one tool, otherwise package components will get overwritten, and
- packages installed by the package tool are specific to an environment and cannot be shared as with Conda, since components are installed directly and not with links.
Prefer Conda over external package managers
Installing the same package in multiple environments with an external package tool consumes quotas in terms of storage space and number of files, so prefer Conda when possible. This is particularly important for the inode limit, since some packages install a large number of files, and the hard links used by Conda do not consume inodes or disk space.
Pip
In this example pip is used to manage packages in a Conda environment with MkDocs related packages. To install the packages, create an environment
micromamba env create --name mkdocs
micromamba activate mkdocs
pip
micromamba install --channel conda-forge pip
The pip will be the only package that will be managed with Conda. For instance, to update Pip activate the environment,
micromamba activate mkdocs
micromaba update --all
pip in our case). All other packages are managed by pip.
For instance, assume that a mkdocs project requires the following packages:
mkdocsmkdocs-minify-plugin
The package mkdocs-minify-plugin is less popular and thus is is not available though a Conda channel, but it is available in PyPI. To install it, activate the mkdocs environment
micromamba activate mkdocs
pip
pip install --upgrade mkdocs mkdocs-minify-plugin
micromamba created for the Conda environment, for instance
${HOME}/micromamba/envs/mkdocs
micromamba. As a results, 'system-wide' installations with pip inside a Conda environment do not interfere with system packages.
Do not install packages in Conda environments with pip as a user
User installed packages (e.g.pip install --user --upgrade mkdocs-minify-plugin) are installed in the same directory for all environments, typically in ~/.local/, and can interfere with other versions of the same package installed from other Conda environments.
Pkg
The Julia programming language provides its own package and environment manager, Pkg. The package manager of Julia provides many useful capabilities and it is recommended that it is used with Julia projects. Details about the use of Pkg can be found in the official documentation.
The Pkg package manager comes packages with Julia. Start by creating an environment,
mocromamba env create --name julia
micromamba activate julia
micromamba install --channel conda-forge julia
In order to install a Julia package, activate the Julia environment, and start an interactive REPL session,
$ julia
julia>
julia without any input files.
- Enter the Pkg package manager by pressing
]. - Exit the package manager by clearing all the input from the line with backspace, and then pressing backspace one more time.
In the package manager you can see the status of the current environment,
(@julia) pkg> status
Status `~/micromamba/envs/julia/share/julia/environments/julia/Project.toml` (empty project)
(@julia) pkg> add Example
(@julia) pkg> remove Example
(@julia) pkg> update
After installing the Julia language in a Conda environment, the language distribution itself should be managed with micromamba and all packages in global or local environments with the Pkg package manager. To update Julia activate the Conda environment where Julia is stored and call
micromamba update julia
update command of Pkg. The packages for local and global environments are stored in the Julia installation directory, typically
${HOME}/micromamba/envs/julia/share
Advanced management of package data
Julia packages will consume storage and number of files quota. Pkg uses automatic garbage collection to cleanup packages that are no longer is use. In general you don't need to manage then package data, simply remove the package and its data will be deleted automatically after some time. However, when you exceed your quota you need to delete files immediately.
The immediate removal of the data of uninstalled packages can be forced with the command:
using Pkg
using Dates
Pkg.gc(;collect_delay=Dates.Day(0))
Sources: Immediate package data clean up
Useful resources
Combining Conda with external environment management tools
Quite often it is required to create isolated environments using external tools. For instance, tools such as virtualenv can install and manage a Python distribution in a given directory and export and import environment descriptions from text files. This functionalities allows for instance the shipping of a description of the Python environment as part of a project. Higher level tools such as pipenv automate the process by managing the Python environment as part of a project directory. The description of the environment is stored in version controlled files, and the Python packages are stored in a non-tracked directory within the project directory. Some wholistic project management tools, such as poetry, further integrate the management of the Python environment withing the project management workflow.
Installing and using in Conda environments tools that create isolated environments is relatively straight forward. Create an environment where only the required that tool is installed, and manage any subenvironments using the installed tool.
Create a different environment for each tool
While this is not a requirement it is a good practice. For instance, pipenv and poetry used to and may still have conflicting dependencies; Conda detects the dependency and aborts the conflicting installation.
Pipenv
To demonstrate the usage of pipenv, create a Conda environment,
micromamba enc create --name pipenv
micromamba activate pipenv
pipenv package
micromamba install --channel conda-forge pipenv
pipenv is managed with Conda, for instance to update pipenv activate the environment
micromamba activate pipenv
micromamba update --all
pipenv as usual to create and manage project environments.